About The Layout
Layout details
The layout has grown and evolved since I started working on it in 2012. It now depicts almost the entire railway, although with some bits shortened for practical reasons. It is stocked with locos, coaches and wagons that are all models of the real ALR fleet, mostly modelled from scratch.
See the Contact page if you wish to enquire about booking the layout for your exhibition.
Some key details:
- Name: Abbey Light Railway
- Scale: 1:43.5 / British ‘O’ scale / 7mm = 1foot
- Gauge: 14mm (accurately representing 2 foot gauge)
- Track: Hand made using Peco code 75 rail
- Control: 0-12v DC using 2x Gaugemaster walkabout controllers
- Point and turntable control: Peco Smartswitch servo system

Click on the + beside each paragraph to read more about the development of the layout and story behind it.
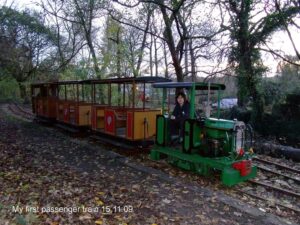
I have been a railway modeller for my whole life. It started in N gauge, ‘helping’ my Dad to run his layout in the spare room. When I was 4, my first loco (Minitrix A4 Sir Nigel Gresley) was presented to me on top of my birthday cake and I was given my own first layout the following Christmas. As my collection of locos and rolling stock grew, that layout was replaced by a slightly larger one in my bedroom, and that too was eventually replaced with an even bigger layout in the loft. I was also an Abbey Light Railway volunteer from an early age, although to begin with it was ‘helping’ Dad by riding in the locos he was driving and generally following him around. One year on Kirkstall festival day I had a small taste of exhibiting a layout to the public, as we had a few set up in the shed doorway to keep people entertained as they waited for the trains. I also had my first go at operating a OO9 layout and being impressed by its running qualities, which led to me having a dabble with that and the next year I brought my own OO9 layout to show on gala day. A few years later I began helping Robin Brogden with his multi-award winning OO layout ‘Museum of Transport’ and from then on my weekends were split between the ALR, exhibiting the museum with Robin around the country, and for a while I had a girlfriend too. Modelling wise, N gauge was still king, but I started scratch building interesting things to add to the Museum in 1:76 scale (such as static models of the Listowell and Ballybunion monorail, the Bennie Railplane and a GWR broad gauge loco). At the ALR I had progressed to being one of a small group of regular drivers as well as helping with all manner of other projects.
One of my best was single-handedly repainting No.4 ‘Vulcan’ into the fleet colours of lined green, which it wore for about a decade. I was also finishing university and wondering what to do next, when by chance Dad noticed a job advert in Railway Modeller for Design Engineer at PECO, which required the CAD skills I had been taught at uni. It was strange as Dad didn’t normally look at the adverts in great detail, so perhaps it was fate! I applied, interviewed and luckily got it!
In the summer of 2010 I moved out of the family home to start life on my own in sunny Devon, taking a small flat in Seaton (near enough to Beer, where PECO is based). I was working under Bob Phelps, who at that point had been head designer and draughtsman at the company for nearly 50 years. As well as designing new products, Bob and I were responsible for various modelling projects when they came along, such as dioramas for adverts or exhibitions, which helped me improve my skills with practice and Bob’s patience, kindness and advice. However, being in Devon now meant I could only get to the Abbey Light Railway during visits home, and I could only help Robin when he had exhibitions in the south, as he is based in Lancashire. I decided I wanted to combine them both, and build a model of the Abbey Light Railway!
One of the early design projects I was involved with was the small radius SM-32 turnouts. At the time I thought this would be a great scale to build a model of the ALR in, using these new points. The locos would be big enough to get DCC sound inside (Bob was also a DCC expert and would have helped me with this) and I could fit loads of detail into them. As the railway was still operational at the time I could even have made my own sound files for each loco and the distinctive flange squealing noises the coaches made on the curves. Then I laid out the turnouts and realised how much space SM-32 (1:19 scale on 32mm gauge track – normally garden railway size) would need, and this didn’t fit in my small flat, let alone the car to take it anywhere. I had discounted OO9, as my earlier dabble into it had taught me it was better for larger narrow gauge prototypes and there was very limited choice for small industrial locos and very few chassis suitable for them to run on. I briefly looked at O-16.5 (now also known as NG7) but the track scales out at 2’3” gauge, which would mean most of the 2’ gauge ALR stock would have to be compromised in some way to fit on the wider track. Some of them only just fit on 2” gauge, so for me that was ruled out. Then a friend suggested O-14. I had heard of it, but the fact the track has to be hand-made put me off. After a bit of research I realised there was kits by Nonneminstre for some of the locos, and other locos, track and rolling stock from KBscale (developed by the late Roy Link, a former PECO employee). My friend offered to sell me some bits he had to get me started, and I figured that as a designer at PECO I ought to be able to hand lay track, and Bob would probably help me if I asked him (which he did). So it was decided!
I acquired some kits and the first models were made. No.1 ‘Atlas’ was the first, from the Nonneminstre Hudson-Hunslet kit with some additions to make it into the loco I knew. On my next visits to the ALR I made sure to take lots of reference photos of things (although never enough, now its gone), and I brought Mini Atlas along to show Peter, and for it to meet its full size counterpart.
My initial idea for a layout was to depict the yard area between the sheds and the ramp, with the main running line disappearing into the compound and out of sight up the line, curving behind the scenes to form a loop, allowing the passenger train to run continuously while I shuffled things around in the yard. I got as far as baseboard and some track, but having never modelled in O14 before or made my own track before I had overestimated my abilities and it never really worked out. However, I had invested time and effort and money into building up the rolling stock, so I wasn’t going to back out!
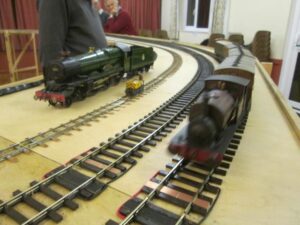
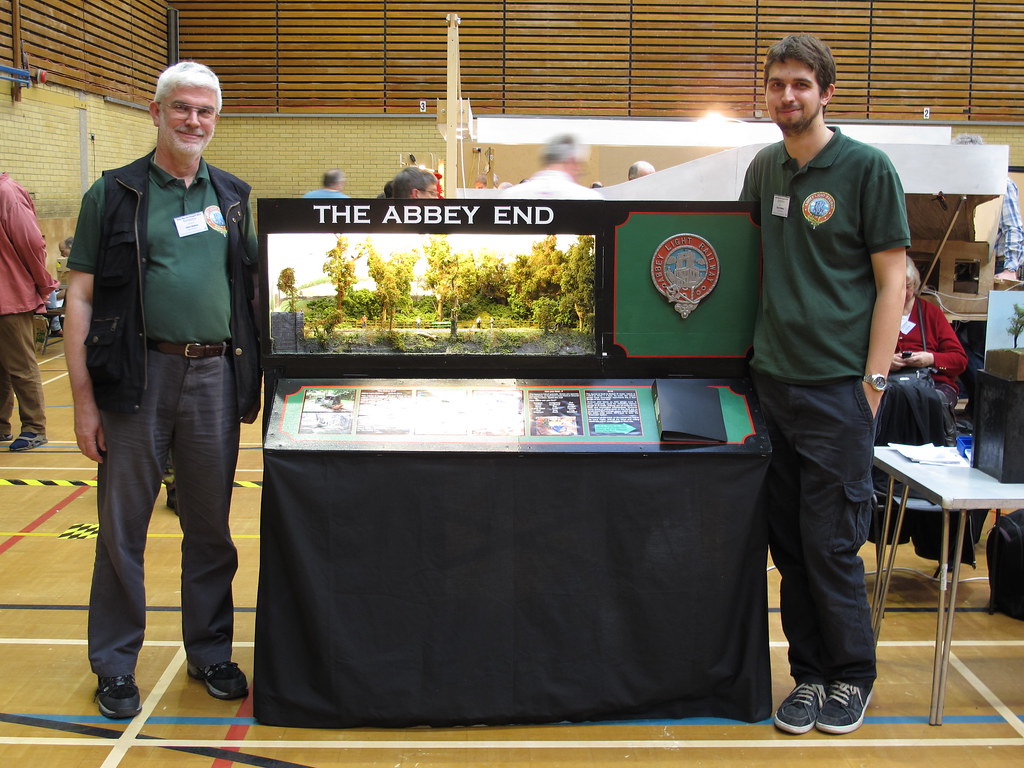
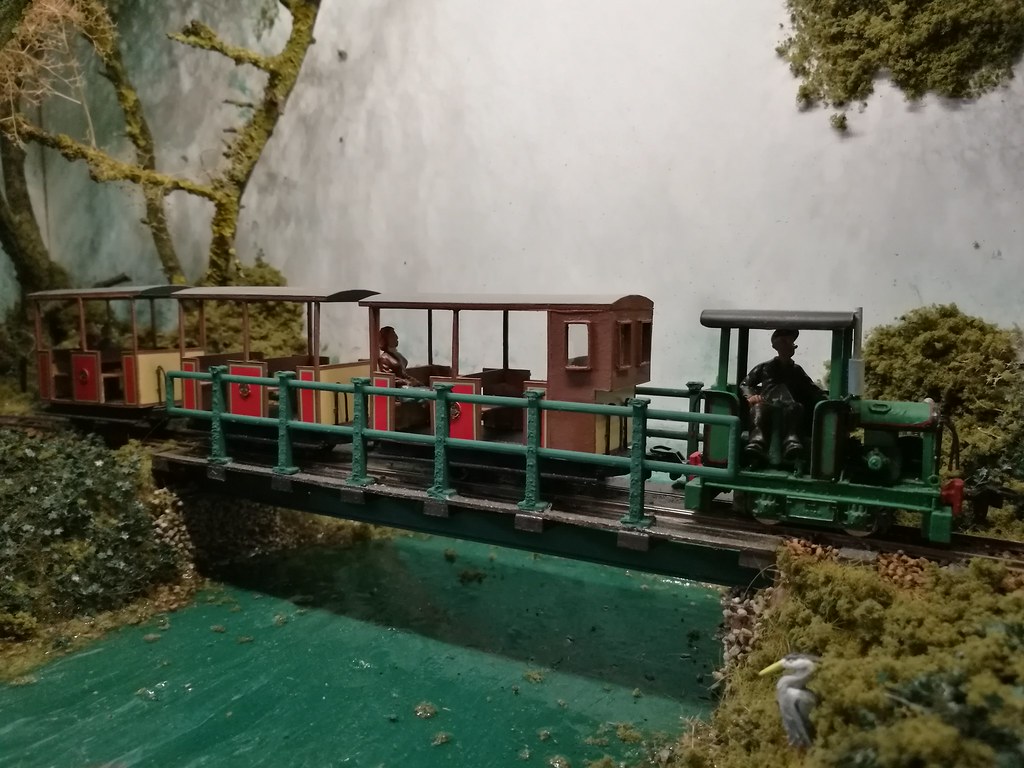
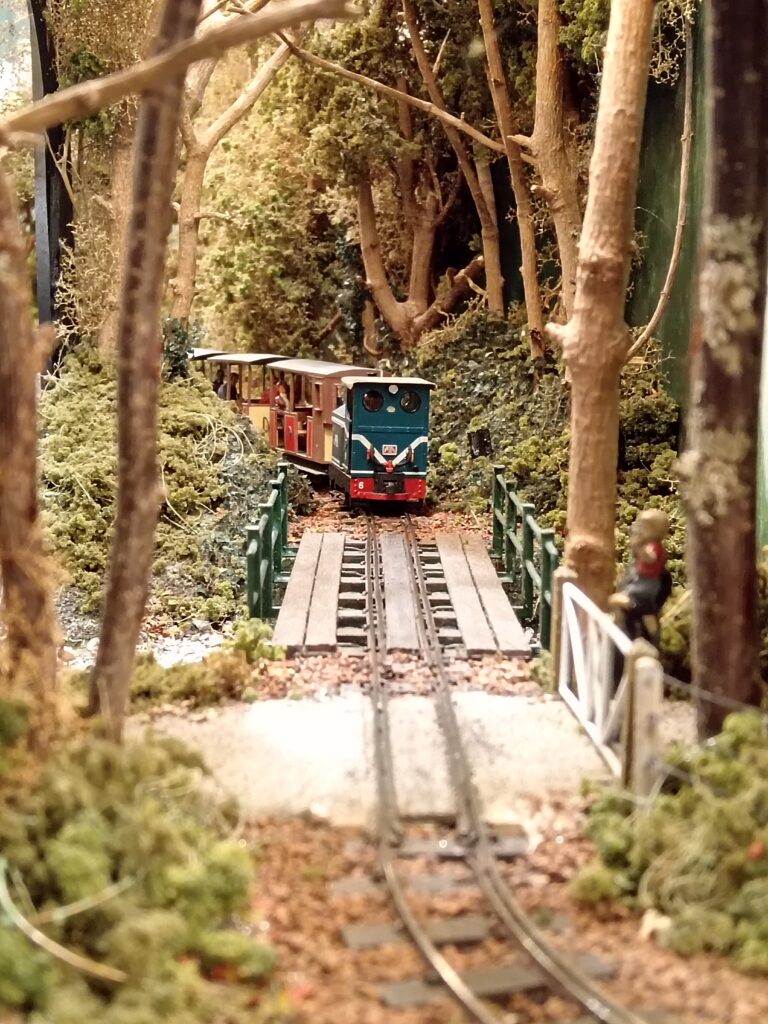
I then had the idea to park my adventurous yard idea and build something much smaller and more achievable. I chose the Abbey station, with the track plan that was just a simple run round loop only requiring two points running off into the fiddleyard with a sector plate to swap trains over. I’d need the three passenger coaches, already had Atlas to haul them and everything else was a bonus! The Abbey station, being on a shelf cut into the hillside, was also ideal scenically, as from the Mill Race side it’s tiered like a theatre, so ideal for viewing from that side. I’d also include Kirkstall Abbey on the backscene (a bit closer than in reality) to answer the question why it’s called the Abbey Light Railway. As it was just the top station rather than the whole thing, I decided to call this layout ‘The Abbey End’, as that is how we usually referred to it. From my years helping Robin with the Museum I had realised that the little animations and cameos were what kept the interest of the general public, so I aimed to fill it with as many moving bits and animals to spot as I could. A whole pack of Langley woodland animals and birds was painted up and fitted into the scene, and by use of servos I got some animation in the form of a man pulling the point lever when the points change (although he had hold of the wrong lever by mistake), a photographer turning to face the train in the platform while raising his camera and a rat emerging from a hole in a wall at regular intervals. It ended up something that would fit in my small flat (on the kitchen counter, in fact) and in my small hatchback to transport, including legs and an information panel which featured a slideshow of photos of the real thing on a digital photo frame. Unfortunately, during it’s construction the layout went from ‘modern image’ to ‘historic model’ as the ALR closed and was lifted during this time. The layout made it’s debut at ExnoNG in Swanley, Kent in 2014. Continental Modeller editor Andrew Burnham gave me a lift to the show with the layout and my Dad met us by train. The layout performed excellently at the show, which involved my ALR passenger train visiting other O14 layouts at the show, and some of their locos (Vale of Ffestiniog!!) making brief appearances on the Abbey End.
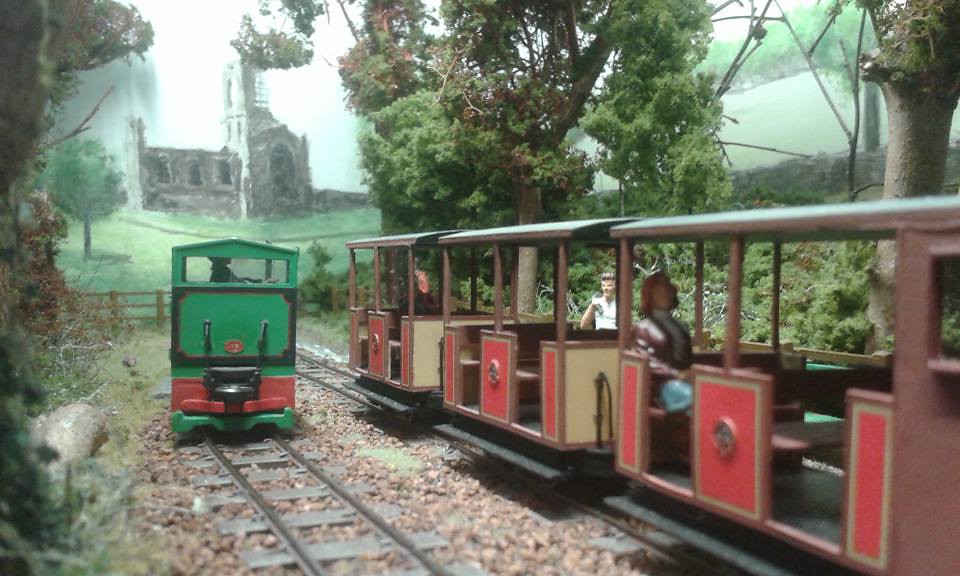
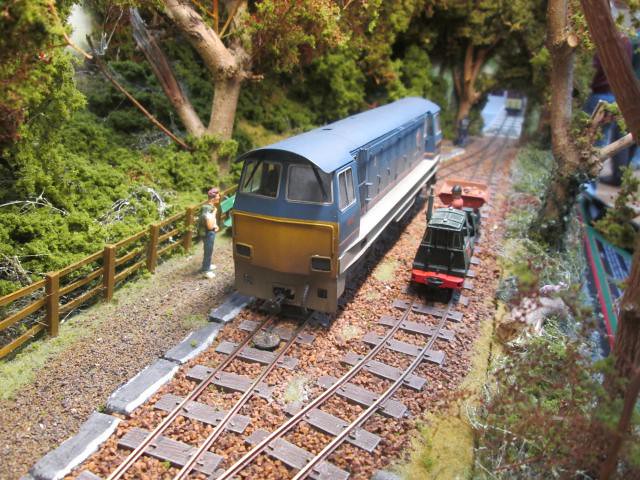
While I lived at Seaton I met my now wife and we moved in together to a new-build house in Feniton (ex-Sidmouth Junction). The new house had a garage, although for some weird legal reason it wasn’t allowed electricity in there. However, this was more space in which to build and store more layout. The Abbey End had done quite a few shows, but the simple track plan only allowed limited operation which was getting a bit boring. Also I hadn’t stopped building rolling stock, so needed more layout to show them off! I decided to revisit my idea of building the yard, and connect it to the existing layout by a scene depicting the bridge and level crossing, which was arguably the most scenic bit. The three scenes would remain separate with a backscene between each one to symbolise that there is a bit missing between each one. Construction took place in the garage, with an extension lead thrown over the fence from the house for power and lights. for the yard board I had to include the turntable. We mostly used this for moving locos between the sheds or out onto the running line, so the model of it is actually just a sector plate, moved about 45 degrees by a servo motor below it. I asked Bob to build three more points for me, and I built the fourth one myself, which is buried in the grass outside the big shed. A second controller was added and operation was now a two person job, with one person driving trains up to the Abbey End as before, and the second person switching locos over for them in the fiddleyard and shuffling locos and wagons around in the yard. After a few late nights out in the garage, the layout was completed in readiness for appearing at the ‘Great and Small 2’ gala at the Welsh Highland Railway, where the layout would be displayed in the old goods shed at Dinas.
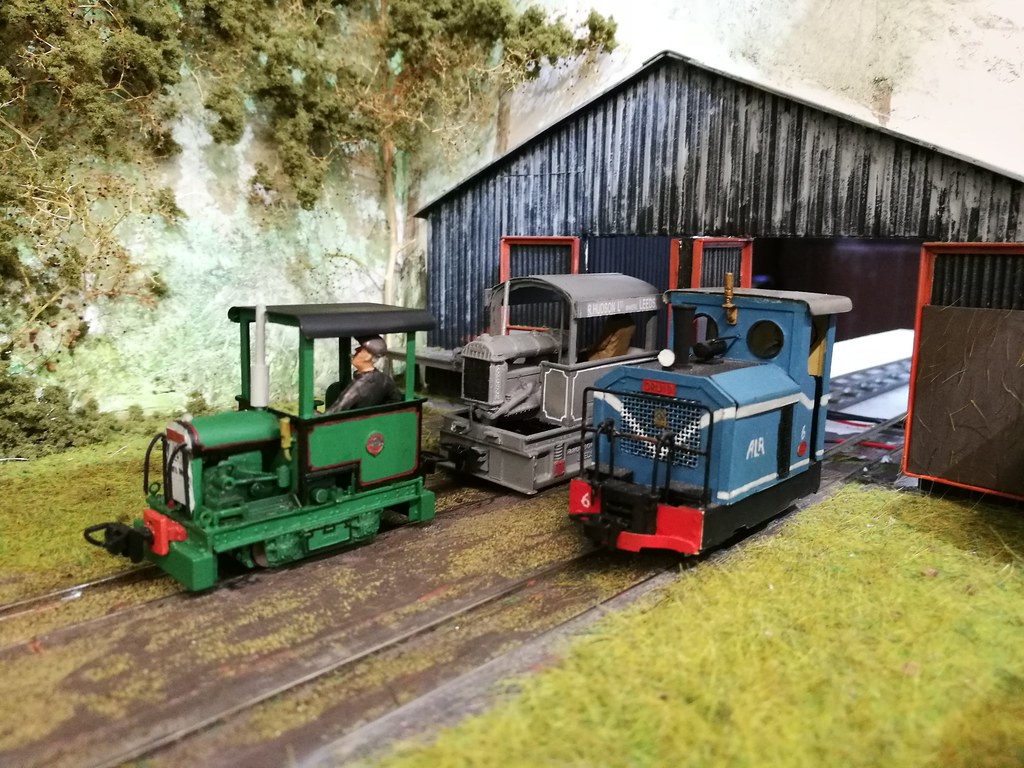
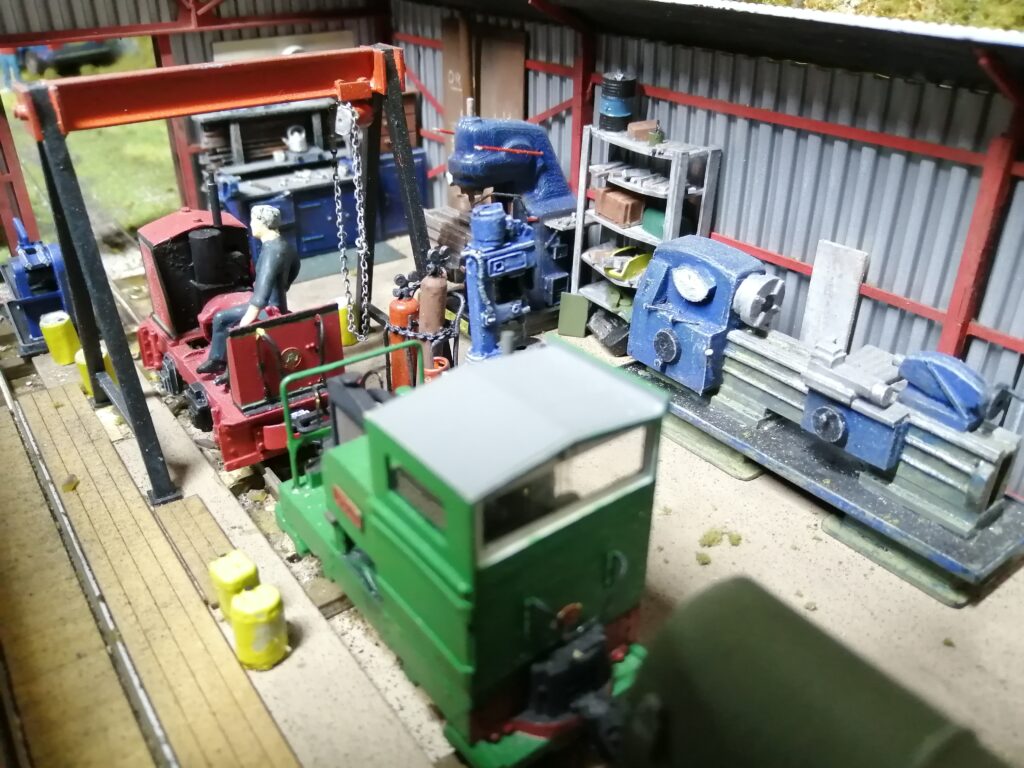
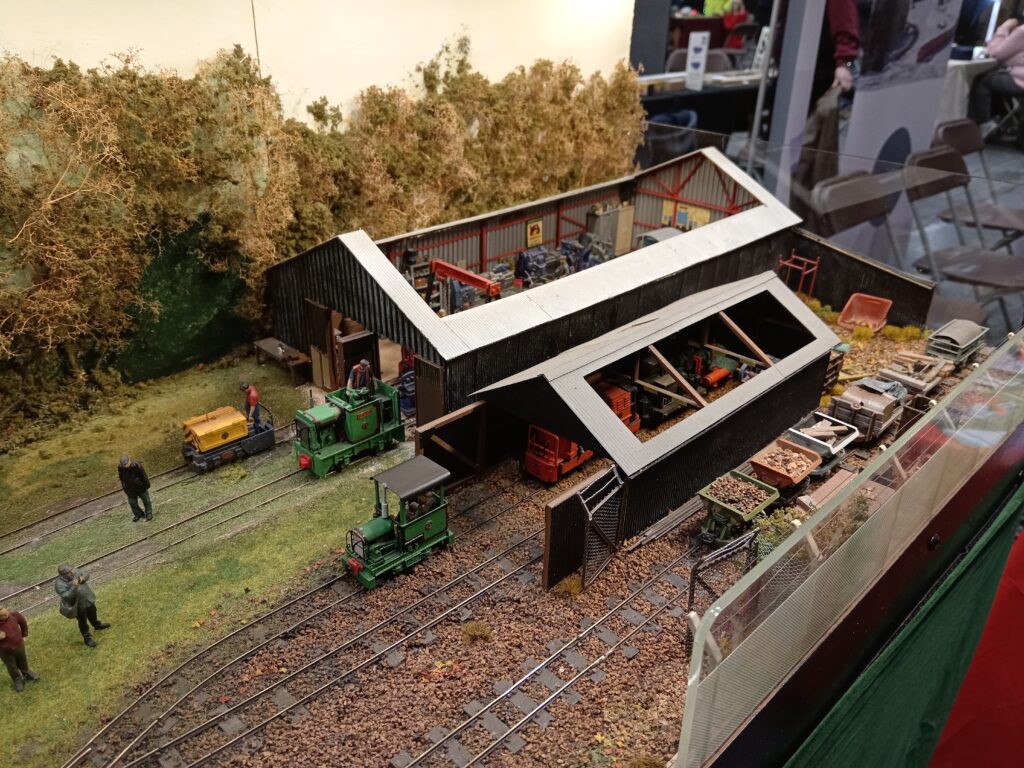
A problem I had with the layout as it stood was the interior of the sheds. I’d modelled the end walls as relief detail on the backscene, with the tracks leading into the fiddleyard beyond them. I added an interior wall to the fiddleyard to hide some of the view of the world beyond, but this only worked effectively from certain angles and in most cases it just didn’t look right. I also didn’t like the way thing parked in the shed, and there was now too much rolling stock to pose outside, was completely hidden from view. All that effort building a model to just hide it away from the very people that have paid to see it! I decided to extend the yard board by the length of the big shed in place of the fiddleyard, and include models of the sheds with their roofs omitted and the interiors detailed. This would enable me to have everything on display, whether it’s outside running or out of the way (or even failed!) in the shed. It was also a good challenge to model the interiors, which were never what one would describe as neat and tidy!
I started building them separately to the rest of the layout in 2019. The little shed was mostly completed and the big shed simply a laser cut plywood framework, made utilising the laser cutter at work. Work continued on the sheds slowly over the next couple of years, pausing for a period during the Covid19 pandemic where I got back into OO9 with a small modular layout and a period where we had moved out while we had building work happening in the house. Once exhibitions were taking place again after the pandemic I got a booking for Narrow Gauge North in March 2023, which gave me a deadline to have the changes to the layout finished by. The reason it took so long was the amount of interior detail I wanted in them. I started scratch building some of the furniture in the big shed out of plasticard. The workbench, cupboards and shelving are made this way, as is one of the lathes. I had already built a model of the Ransomes dumper truck, which I had previously posed in the yard. I have a handful of photos of the inside of the shed to work from, and I had to piece it together from that and images found online of similar looking machine tools. While we were away from our house for the builders I modelled more machine tools up in CAD, ready to 3D print and add to the scene when we returned. In the end it’s about a 50/50 split of traditional scratch building from plasticard and 3D printing, but all from my own design. I don’t think I’ll have ever added enough detail to the sheds, in reality every spare inch was used to store something or other, so I have plenty more to add, although most of the major bits are currently done.

At the same time as adding the sheds to the layout, I decided it’d be a good idea to do away with the scenic breaks between the three sections of layout. The unavoidable hole in the backscene that the train passed through was never easy to disguise and in my opinion spoiled any photos it appeared in, which was most of them. I had the idea of adding about 6” to either end of the existing bridge board and modelling a very shortened version of the part of the line it represented; the bit between the yard and the crossing, and between the cutting after the bridge and the Abbey end station. I also wasn’t too pleased with my first attempt at the bridge, the abutments or the water in the mill race, and the backscene was always too close to the bridge so trains cast a shadow onto it. By the time I had rectified all of these issues it was a completely new board, although the bit of wood in the centre was the same!

The layout is currently as large as I can fit in my car, and also as large as I can set up at home to test run. If I had more space and a larger car I’d like to model Bridge Road station at the other side of the sheds to make it a complete model of the whole railway (albeit shortened in places). I do have plans to develop the rolling stock collection with better running/more accurate versions of some vehicles as well as making models of some plausible ‘might-have-been’ things that may have been part of the fleet if things had worked out differently. Aside from that, I plan to continue exhibiting the layout where possible, see the ‘contact’ page for details!


The layout in print
my ALR-related models have made it into Railway Modeller several times, with my words accompanied by expert photos by editors Steve Flint and Craig Tiley. I have generously been given permission to be able to make the articles available here:
Layout articles
Abbey End, June 2015
ALR Extended, November 2019
ALR Sheds, November 2014